DIY - STi 8 Intercooler onto MY00 Classic
 15 May 2006, 09:23 PM
#1
Well finally got the STi 8 intercooler fitted to the MY00 at the weekend.
I know it's been done before, but I thought I'd add my 2p's worth......
Here's some piccies and a step-by-step guide for those that are interested.
Parts List :
1. STi 7/8/9 Intercooler (Approx �250).
2. Re-circ Dumpvalve for above, should hopefully come with No.1
3. STi 7/8 Left Hand Bracket/Stay (�20)
4. MY00 Samco Hoses, Turbo (Approx �60, but I expect you already have these)
5. Samco Superflex 32mm hose (Approx �27, for 1m)
6. Short piece of Alluminium Extrusion (Approx �4, B&Q)
7. Small piece of Alluminium 5mm plate
8. A few M8 Nuts & Washers
Total Cost : �301 (if you already have the MY00 Samco's)
Tools :
1. 12mm Socket
2. 12mm Spanner
3. 10mm Socket
4. Large Flat Blade Screwdriver
5. Hacksaw
6. Coping Saw
7. Electric Drill
8. 3mm Drill bit (for pilot holes)
9. 8mm Drill bit
10. File or dremmel to tidy cut/drilled edges.
INSTRUCTIONS :
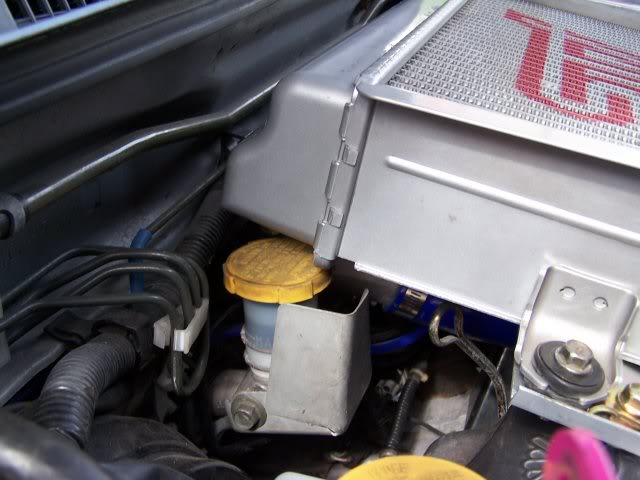
Clutch Fluid Reservoir Modification
1. Remove Standard Intercooler, including all associated Hoses and brackets.
2. Remove heat shield from Clutch Fluid Reservoir.
3. Remove Yellow lid from clutch Fluid Reservoir and remove fluid from reservoir using a Syringe.
4. Remove Jubilee clip from base of Clutch Fluid Reservoir
5. Remove Plastic Reservoir, ready for modification.
6. Modify/shorten clutch fluid Reservoir by cutting approx 20mm from base
7. Refit Reservoir and Jubilee clip and re-fill with removed fluid.
8. Refit Lid and heatshield
Shortened Clutch Fluid Reservoir
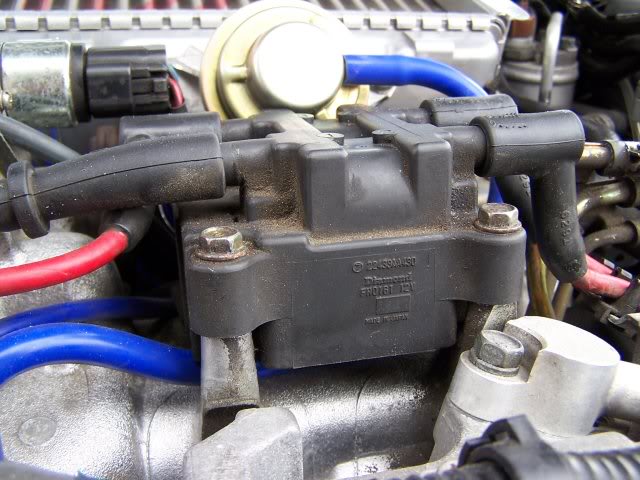
Coil Pack Height Modification
1. Remove HT Leads from Coil Packs, taking note of order.
2. Remove Coil Pack from inlet manifold by removing the 3-Off 10mm bolts.
3. Using a Right-Angled coping saw cut approx 5mm from each of the 3 aluminium coil pack posts.
4. Refit Coil Pack to shortened posts, Refit HT leads.
Coil Pack height reduced
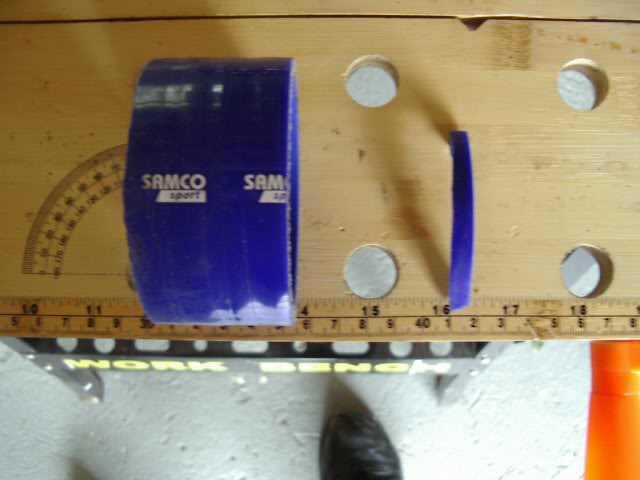
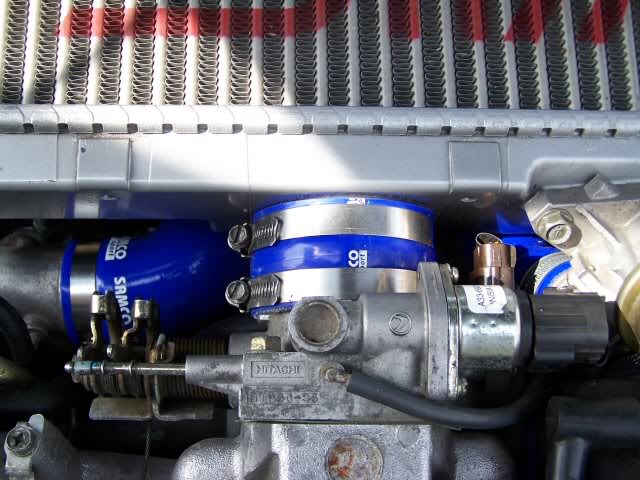
Samco Inlet Modification
This allows the Intercooler to fit closer to the throttle body and hence provides better bulkhead clearance and allows the cooler to sit at a more standard height.
1. Shorten the Intercooler to Throttle Body Samco by approx 5mm.
Samco Inlet Trim
Samco Y-Piece Vs STi
Originally I fitted a 90 degree elbow to the Sti Alloy Y-piece, as recommended by alot of other people that have done this. However, this did not fit too well and caused the Samco to twist and kink slightly. The problem appeared to be that the MY00 Samco bends slightly upwards and sits closer to the Intercooler.
I thought about attacking the standard MY00 Samco in order to get a better fit.
But.....when inspecting the 2 types of induction pipework I noticed that the size/spacing looked the same between the STi Alloy Y-Piece and Samco Y-Piece. Infact the Samco appeared leass restrictive.
Hey presto a quick swap and the MY00 Samco and Alloy fitting are on the STi Cooler and looking like they will fit.
1. Swap MY00 Samco Y-Piece onto STi Intercooler…..then place STi 8 Alloy Y-piece on Ebay
2. Adjust Samco Y-piece slightly (see photo) to provide a better fit when attaching to Turbo. Although the Samco is not tight up against it’s preferred marking, there is plenty of material to byte on with the Jubilee clips.
Samco Y-Piece Swap
Note : Image shows MY00 Samco Y-Piece fitted to STi Intercooler. STi Alloy Y-Piece is on the floor
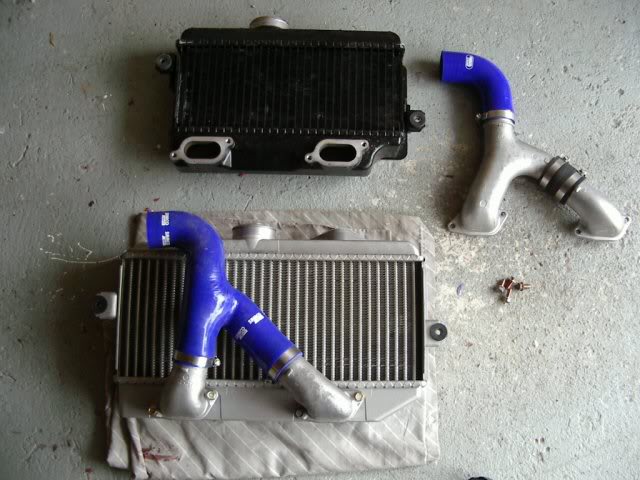
Samco Y-Piece Adjustment
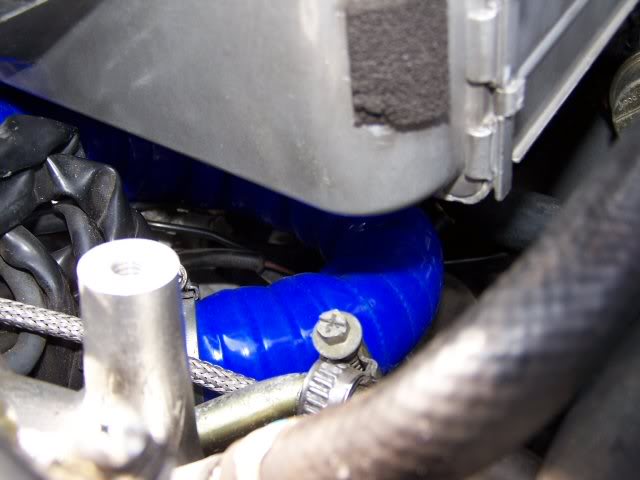
Samco Flexi Re-Circ DumpValve fitting
1. Cut Length of 32mm Flexi Samco (Approx 450mm)
2. Fit Flexi Samco to Dumpvalve ‘Hard’ return pipe.
Flexi Samco DumpValve
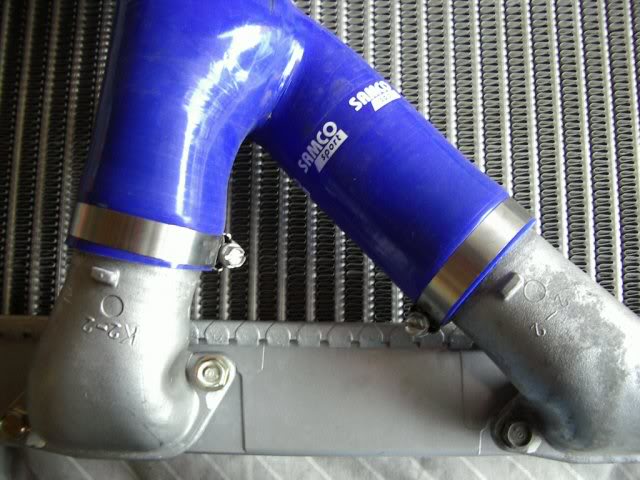
Fit Intercooler and Hoses
1. Fit STi8 Left Hand Bracket to gearbox.
2. Fit Intercooler to Throttle Body Hose, with loose hose clips.
3. Fit Intercooler into Intercooler to Throttle body hose (you won’t believe how much easier this is with the 5mm trimmed of the hose earlier)
4. While doing the above, also guide the Turbo Outlet Samco onto the Turbo, again remembering to have the hose clip already fitted loosely.
5. Once both throttle Body and Trubo hoses are on, pull the turbo hose on tight and secure hose clip.
6. Check Throttle Body connection is still secure, then tighten hose clips.
7. Loop the Samco Flexi from the DumpValve return hose, under the intercooler, to protrude in the vicinity of the Dump Valve.
8. Secure DumpValve to Samco Flexi, then Secure Dumpvalve to Intercooler.
Intercooler Hoses Fitted
Left hand bracket/Support
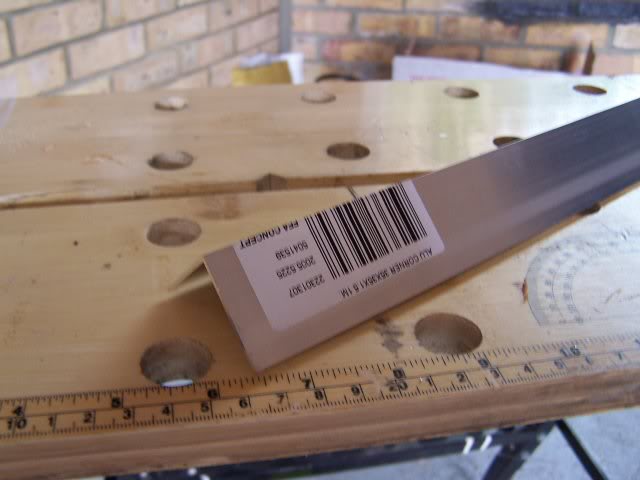
1. Cut Length of Alluminium Extrusion, trim and Drill 2-Off 8mm holes. For this it is best to make your own measurements as each application may differ slightly.
2. Secure Alluminium Extrusion Bracket to STi 8 Bracket and Intercooler. I fitted this to the underside in order to allow the Intercooler to sit lower.
Alluminium Extrusion
Left Hand Bracket
Right Hande Bracket/Support
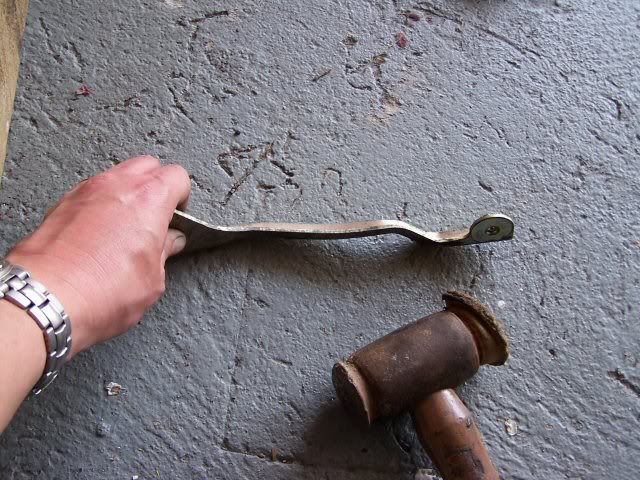
1. Place Bracket on floor and hit with hammer (see picture). This should bend the centre of the bracket slightly in order to clear the edge of the intercooler.
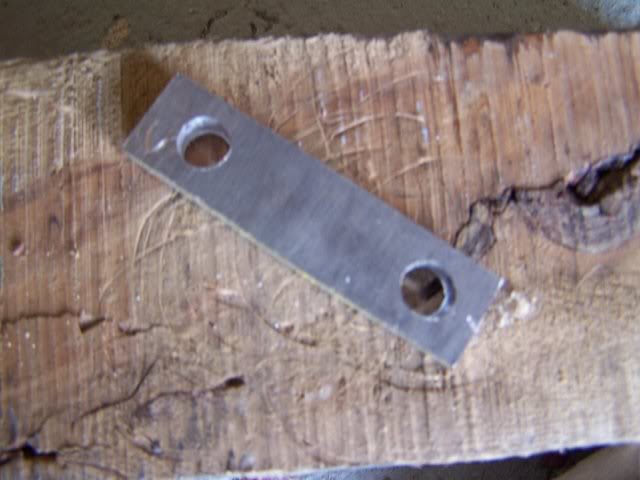
2. The bracket can be bent in 2 directions in order to get it to line up with the existing holes. However I didn’t want to bend it too much so made a spacer as shown below
Bending Bracket
Spacer
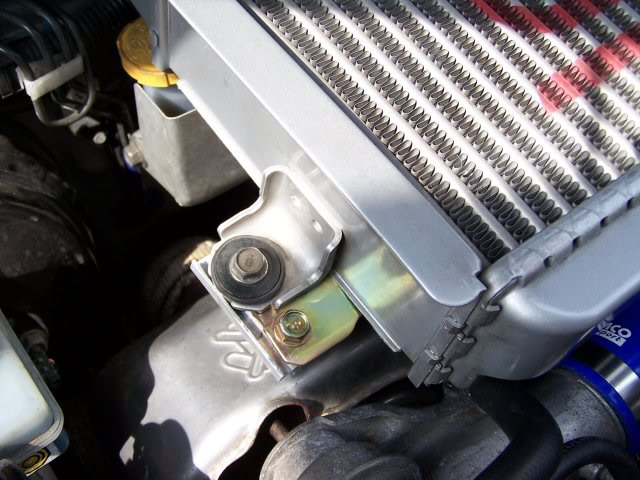
Right Hand Bracket Fitted
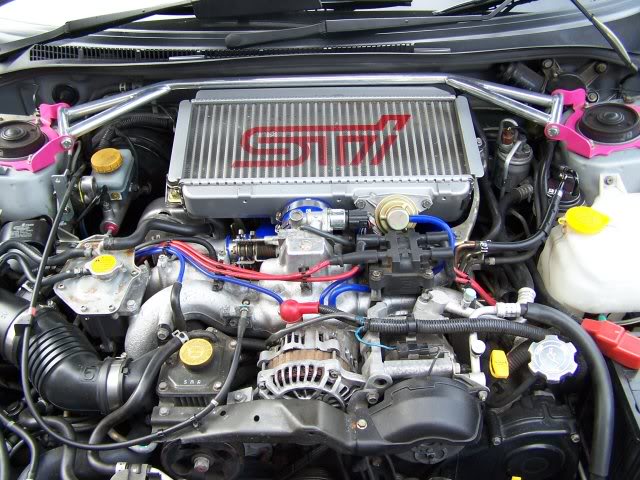
Finished Article, with Strut Brace
1. It may be required to pack between the Left/Right Brackets and Intercooler with Spacers/Washers in order to ensure the underside of the intercooler does not bang on the Bulkead/Gearbox bracket. I used 2-3 washers.
Finished
Running Report.....
After a bit of settling time the cooler was fouling slightly on the bulkhead when starting/stopping the engine, this was being caused by the Flat Four side to side movement.
Investigation found 2 problems :
1. One of the hose clip screws on the turbo To Intercooler Samco was fouling on the 'Right Hand Side' of bulkhead webbing surrounding the gearbox support, under the intercooler
SOLUTION : Turn Hose Clip round i.e make sure both hose clips have their adjustment screws on the outside edges.
Don't fit Hose Clips this way, but rotate 180 Deg

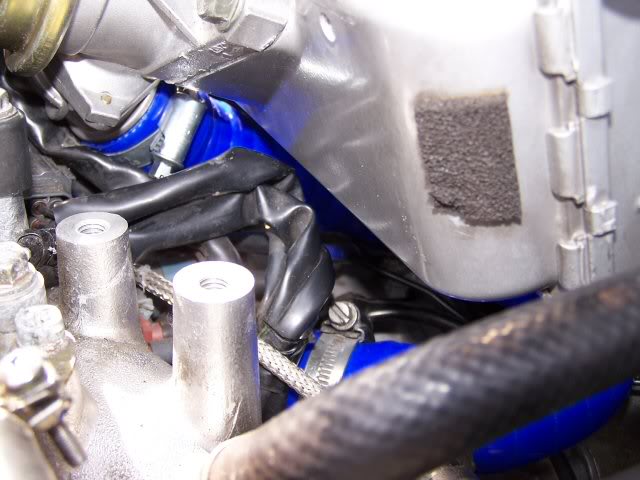
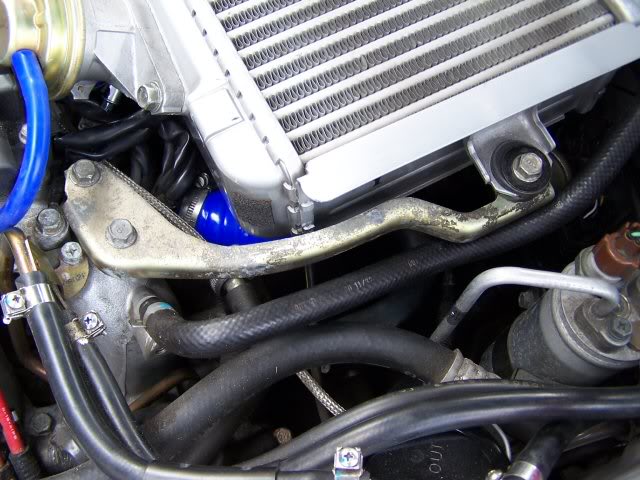
2. The Left hand Intercooler Alluminium connection i.e where the Samco connects to the Intercooler (see above image), was also fouling the bulkhead webbing surrounding the gearbox support. this time on the 'Left Hand Side'.
SOLUTION : place length of wood against webbing, and **** it with a hammer to bend it back a few millimeters.
I can now flex the intercooler left/right/up and down without securing the brackets and is does not foul anything. Once the brackets are fitted it won't move as much, so problem solved.
I know it's been done before, but I thought I'd add my 2p's worth......
Here's some piccies and a step-by-step guide for those that are interested.
Parts List :
1. STi 7/8/9 Intercooler (Approx �250).
2. Re-circ Dumpvalve for above, should hopefully come with No.1
3. STi 7/8 Left Hand Bracket/Stay (�20)
4. MY00 Samco Hoses, Turbo (Approx �60, but I expect you already have these)
5. Samco Superflex 32mm hose (Approx �27, for 1m)
6. Short piece of Alluminium Extrusion (Approx �4, B&Q)
7. Small piece of Alluminium 5mm plate
8. A few M8 Nuts & Washers
Total Cost : �301 (if you already have the MY00 Samco's)
Tools :
1. 12mm Socket
2. 12mm Spanner
3. 10mm Socket
4. Large Flat Blade Screwdriver
5. Hacksaw
6. Coping Saw
7. Electric Drill
8. 3mm Drill bit (for pilot holes)
9. 8mm Drill bit
10. File or dremmel to tidy cut/drilled edges.
INSTRUCTIONS :
Clutch Fluid Reservoir Modification
1. Remove Standard Intercooler, including all associated Hoses and brackets.
2. Remove heat shield from Clutch Fluid Reservoir.
3. Remove Yellow lid from clutch Fluid Reservoir and remove fluid from reservoir using a Syringe.
4. Remove Jubilee clip from base of Clutch Fluid Reservoir
5. Remove Plastic Reservoir, ready for modification.
6. Modify/shorten clutch fluid Reservoir by cutting approx 20mm from base
7. Refit Reservoir and Jubilee clip and re-fill with removed fluid.
8. Refit Lid and heatshield
Shortened Clutch Fluid Reservoir
Coil Pack Height Modification
1. Remove HT Leads from Coil Packs, taking note of order.
2. Remove Coil Pack from inlet manifold by removing the 3-Off 10mm bolts.
3. Using a Right-Angled coping saw cut approx 5mm from each of the 3 aluminium coil pack posts.
4. Refit Coil Pack to shortened posts, Refit HT leads.
Coil Pack height reduced
Samco Inlet Modification
This allows the Intercooler to fit closer to the throttle body and hence provides better bulkhead clearance and allows the cooler to sit at a more standard height.
1. Shorten the Intercooler to Throttle Body Samco by approx 5mm.
Samco Inlet Trim
Samco Y-Piece Vs STi
Originally I fitted a 90 degree elbow to the Sti Alloy Y-piece, as recommended by alot of other people that have done this. However, this did not fit too well and caused the Samco to twist and kink slightly. The problem appeared to be that the MY00 Samco bends slightly upwards and sits closer to the Intercooler.
I thought about attacking the standard MY00 Samco in order to get a better fit.
But.....when inspecting the 2 types of induction pipework I noticed that the size/spacing looked the same between the STi Alloy Y-Piece and Samco Y-Piece. Infact the Samco appeared leass restrictive.
Hey presto a quick swap and the MY00 Samco and Alloy fitting are on the STi Cooler and looking like they will fit.
1. Swap MY00 Samco Y-Piece onto STi Intercooler…..then place STi 8 Alloy Y-piece on Ebay
2. Adjust Samco Y-piece slightly (see photo) to provide a better fit when attaching to Turbo. Although the Samco is not tight up against it’s preferred marking, there is plenty of material to byte on with the Jubilee clips.
Samco Y-Piece Swap
Note : Image shows MY00 Samco Y-Piece fitted to STi Intercooler. STi Alloy Y-Piece is on the floor
Samco Y-Piece Adjustment
Samco Flexi Re-Circ DumpValve fitting
1. Cut Length of 32mm Flexi Samco (Approx 450mm)
2. Fit Flexi Samco to Dumpvalve ‘Hard’ return pipe.
Flexi Samco DumpValve
Fit Intercooler and Hoses
1. Fit STi8 Left Hand Bracket to gearbox.
2. Fit Intercooler to Throttle Body Hose, with loose hose clips.
3. Fit Intercooler into Intercooler to Throttle body hose (you won’t believe how much easier this is with the 5mm trimmed of the hose earlier)
4. While doing the above, also guide the Turbo Outlet Samco onto the Turbo, again remembering to have the hose clip already fitted loosely.
5. Once both throttle Body and Trubo hoses are on, pull the turbo hose on tight and secure hose clip.
6. Check Throttle Body connection is still secure, then tighten hose clips.
7. Loop the Samco Flexi from the DumpValve return hose, under the intercooler, to protrude in the vicinity of the Dump Valve.
8. Secure DumpValve to Samco Flexi, then Secure Dumpvalve to Intercooler.
Intercooler Hoses Fitted
Left hand bracket/Support
1. Cut Length of Alluminium Extrusion, trim and Drill 2-Off 8mm holes. For this it is best to make your own measurements as each application may differ slightly.
2. Secure Alluminium Extrusion Bracket to STi 8 Bracket and Intercooler. I fitted this to the underside in order to allow the Intercooler to sit lower.
Alluminium Extrusion
Left Hand Bracket
Right Hande Bracket/Support
1. Place Bracket on floor and hit with hammer (see picture). This should bend the centre of the bracket slightly in order to clear the edge of the intercooler.
2. The bracket can be bent in 2 directions in order to get it to line up with the existing holes. However I didn’t want to bend it too much so made a spacer as shown below
Bending Bracket
Spacer
Right Hand Bracket Fitted
Finished Article, with Strut Brace
1. It may be required to pack between the Left/Right Brackets and Intercooler with Spacers/Washers in order to ensure the underside of the intercooler does not bang on the Bulkead/Gearbox bracket. I used 2-3 washers.
Finished
Running Report.....
After a bit of settling time the cooler was fouling slightly on the bulkhead when starting/stopping the engine, this was being caused by the Flat Four side to side movement.
Investigation found 2 problems :
1. One of the hose clip screws on the turbo To Intercooler Samco was fouling on the 'Right Hand Side' of bulkhead webbing surrounding the gearbox support, under the intercooler
SOLUTION : Turn Hose Clip round i.e make sure both hose clips have their adjustment screws on the outside edges.
Don't fit Hose Clips this way, but rotate 180 Deg
2. The Left hand Intercooler Alluminium connection i.e where the Samco connects to the Intercooler (see above image), was also fouling the bulkhead webbing surrounding the gearbox support. this time on the 'Left Hand Side'.
SOLUTION : place length of wood against webbing, and **** it with a hammer to bend it back a few millimeters.
I can now flex the intercooler left/right/up and down without securing the brackets and is does not foul anything. Once the brackets are fitted it won't move as much, so problem solved.
Last edited by Scott.T; 29 November 2006 at 10:55 PM.


 15 May 2006, 10:58 PM
#5
Originally Posted by cmpequeno
why didn't you go for an atmo dump valve?
Last time I fitted one it was all Whoosh, Tissh, Bang, Pop, Bang.
Great for a 5min drive round the industrial estate. But not for what doubles as a family 4-door

Trending Topics

 I couldnt even contemplate doing that
17 May 2006, 09:33 PM
I couldnt even contemplate doing that
17 May 2006, 09:33 PM
#11
Originally Posted by Welloilbeefhooked
Is there any contact between the strut brace and IC? What brace is fitted?
Whilst trying to solve the issue detailed inthe 'Runing Report' I bent the right hand bracket up a bit more. However, at the moment this has caused very slight contact on the stut brace. Only really happens when turning right at the moment. I assume this is due to a slight amount of engine movement/twist.
There's quite a bit of play in the strut brace fittings both on the suspension strut and the bar itself, so a little tweak, or some washers will sort, as it's only a slight ring rather then a bang. Probably only talking about the odd millimeter.
As I've sorted the bulkhead problem (detailed in running report) I could probably drop it down a bit again.
I would of had another play tonight but also trying to sell the house at the moment and had some viewings to do.
It'a a bit of a juggling act playing with the odd millimeter here and there, but it's only like this due to me wanting to retain the strut brace. Without the Strut brace there's plenty of room to manouver up/down or further back.
Strut Brace is STi Style from www.Scoobyworld.co.uk
Last edited by Scott.T; 17 May 2006 at 10:03 PM.
 17 May 2006, 09:42 PM
#13
Scooby Regular

Join Date: Aug 2004
Posts: 435
Likes: 0
Received 0 Likes
on
0 Posts
Nice thread. I am getting some banging on engine start/over rough ground which I think is the bottom of the intercooler on something attached to the bulkhead underneath.
I also get a little bit of contact between my strut brace and the tmic, though I have used some foam to fill the gap in a few places.
I also get a little bit of contact between my strut brace and the tmic, though I have used some foam to fill the gap in a few places.
17 May 2006, 10:00 PM
#14
Originally Posted by Carlos13
Nice thread. I am getting some banging on engine start/over rough ground which I think is the bottom of the intercooler on something attached to the bulkhead underneath.
If you take the cooler off you'll probably see some marks on both the intercooler pipes and the bulkhead metal work. It probably only needs a minor tweak.
 21 December 2006, 04:15 PM
#16
Scooby Regular
I used this to for mine 
I actually cut a chunk out the bracket and made some extension pieces from ally .
Had to give the triangle over the engine/gearbox mount a little "Fettle" to stop it banging.
Bit of a shock when you offer it up for the first time though!
I actually cut a chunk out the bracket and made some extension pieces from ally .
Had to give the triangle over the engine/gearbox mount a little "Fettle" to stop it banging.
Bit of a shock when you offer it up for the first time though!
22 December 2006, 09:09 PM
#17
Scooby Regular

Join Date: Aug 2006
Location: ESSEX ...BORN AND BRED PETROL HEAD....................... MANS BEST FRIEND IS A ENGLISH BULL TERRIER
Posts: 1,666
Likes: 0
Received 0 Likes
on
0 Posts
Gonna be doing this in the new year this thread has helped no end 
What have you done to the underside of the airscoop so it grabs all the air ???
kips
What have you done to the underside of the airscoop so it grabs all the air ???
kips
Last edited by KIPS; 22 December 2006 at 09:12 PM.
 25 January 2007, 05:53 PM
#19
Scooby Regular
Join Date: Aug 2005
Location: Haverhill
Posts: 662
Likes: 0
Received 0 Likes
on
0 Posts
As with Floyds Stage III, excellent write up and most help full. Followed both when causing mayhem with mine.
Many thanks for the scraped knuckles and inspiration.

Many thanks for the scraped knuckles and inspiration.

 30 January 2007, 11:30 AM
#20

You will be needing one of these, they will be ready very soon and we can get some pics up,
Carls Scooby Site ver.2
Carls Scooby Site ver.2
Last edited by Power Junkie; 26 March 2007 at 04:02 PM. Reason: New
26 March 2007, 01:50 PM
#21

Very useful write ip and thread. Thanks.
I may fit a new age TMIC on an STi 3 Wagon to continue my charge temperature investigations. I have just tried out an STi 7 scoop, some improvement over O/E but still possible to exceed 70 deg C charge temps quite easily and STi 8 scoop which is a noticable improvement but still not good enough to avoid some very high charge temeratures but probably a stop gap measure before fitting an FMIC.
If you are running an O/E scoop and TMIC on any Scoob ver 1-7 and want to give it WOT regularly for more than a few swconds, I would suggest that monitoring charge temperatures could be a wise move.
If anyone with an STi 8 has monitored charge temperatures with O/E TMIC I am interested in the results.
26 March 2007, 06:52 PM
#22
You will be needing one of these, they will be ready very soon and we can get some pics up,
Carls Scooby Site ver.2
Carls Scooby Site ver.2
I also know of someone local thats knocked up a very nice example.
He is also looking at selling them ,so I will try and get some piccies up.
13 September 2007, 08:18 AM
#23

Good write up, not seen it before. I made a template for the undertray but I think Carlos has it IIRC???
Anyway, some neat solutions to the coil pack, which I didn't think of. I 'modified' the coil pack and the DV. I have made a proper seal for the undertray now and it works really well. I don't have any issues with fouling anywhere either
I also used the reservoir from and STI instead of cutting down the original as I wanted ease of maintenance. The heat shield over the turbo is very important to temps so be wary here if you haven't got one.
I'll post some pics of the undertray on my thread later.
F
24 September 2007, 10:19 PM
#24
Scooby Regular
iTrader: (1)

Join Date: Nov 2001
Location: scoobypedia.co.uk
Posts: 262
Likes: 0
Received 0 Likes
on
0 Posts
Scott.T,
Excellent write-up. Wish I had this when I had my Classic! I've taken the liberty to write up a Scoobypedia article (see below) for more to see your efforts.
http://www.scoobypedia.co.uk/index.p...ntoMY00Classic
Regards,
-Steve.
P.S: If you are not happy with what I've done just let me know. I've only slightly edited it - typo's and replaced 'I' with 'the owner'.


Thread
Thread Starter
Forum
Replies
Last Post
Mattybr5@MB Developments
Car Parts For Sale
1
18 November 2015 07:49 AM